项目存在问题
- 代码量大,耦合严重
- 业务开发分工不明确,开发人员要关心非业务的代码
- 改代码时,可能会影响其他业务,牵一发动全身
优点
- 架构更清晰,解耦
- 业务分工明确,开发人员仅专注与自己的业务
- 提高开发效率
- 组件、业务独立更新版本,可回滚,持续集成
原则
单一的职责
专注于解决一个单一的问题,独立的, 可复用的, 微小的 and 可测试的
组件命名
- 有意义的: 不过于具体,也不过于抽象
- 简短: 2 到 3 个单词
- 具有可读性: 以便于沟通交流
# bad: Menu Table# bad: UserCenterLeftPartOperateMenu# bad: Xmenugood: UserCenterMenu
组件表达式简单化
过于复杂的判断逻辑抽离,不要在render中写臃肿的表达式,保持组件dom简洁,可读。
bad:{ this.state.hasQueue && this.state.hasQueue.length > 0 && this.state.hasQueue.indexOf(value.id) > -1 ? <a href={TJ.tourl('/directivity?orderId=' + value.id) } className="line-normal-btn fl maincolor mainborder">智能导引单</a> : null }{((value.examDate && !value.isLocalePay && (value.status == 2 || value.status == 1 || value.status == 0) && !value.isExport) && !value.isHidePrice) ?<a href="javascript:;" className="line-normal-btn" onClick={this.changeItems.bind(this, value)}>改项目</a>: null}
good:
// 是否可见智能导引单let isHasQueue = this.state.hasQueue && this.state.hasQueue.length > 0 && this.state.hasQueue.indexOf(value.id) > -1;// 是否可改期// 订单状态:...order statuslet canChangeItem = function(value) {return ((value.examDate && !value.isLocalePay && (value.status == 2 || value.status == 1 || value.status == 0) && !value.isExport) && !value.isHidePrice)}{ isHasQueue && <a href={TJ.tourl('/directivity?orderId=' + value.id)} className="line-normal-btn fl maincolor mainborder">智能导引单</a> }{ !!canChangeItem(value) ? <a href="javascript:;" className="line-normal-btn" onClick={this.changeItems.bind(this, value)}>改项目</a> }
ps:
{placeholder && <span className="fr text-grey linehight48">{placeholder}</span>}# 这种简写有问题,当placeholder为0的时候,显示不正常; 需要 placeholder 为 boolean 型。转化为boolean型:{!!placeholder ...}
不使用难以理解的「魔鬼数字」
bad:
// 订单是否可改期let canChangeItem = function(value) {((value.examDate && !value.isLocalePay &&# (value.status == 2 || value.status == 1 || value.status == 0)&& !value.isExport) && !value.isHidePrice)}
good:
const ORDER_STU = {unpay: 0, // 未支付paid: 1, // 支付完成paying: 2 // 已预约}(value.status == ORDER_STU.paying || value.status == ORDER_STU.paid || value.status == ORDER_STU.unpay)
组件 props 原子化
尽量只使用JavaScript 原始类型(字符串、数字、布尔值) 和 函数。尽量避免复杂的对象
<!-- bad --><range-slider :config="complexConfigObject"></range-slider><!-- good --><range-slider:values="[10, 20]"min="0"max="100"step="5":on-slide="updateInputs":on-end="updateResults"></range-slider>orlet complexConfigObject = {.., ...., ..}<range-slider{...complexConfigObject} ></range-slider>
验证组件的 props,由其对于ui组件
提供默认值
使用 type 属性校验类型
使用 props 之前先检查该 prop 是否存在
好处:保证你的组件永远是可用的(防御性)
React.createClass({getDefaultProps()...propTypes: {hospitals: React.PropTypes.array.isRequired,...// vueexport default {props: {max: {type: Number, // 这里添加了数字类型的校验default() { return 10; },}...
当前component 指向 this
尽量不要这样:
const self = this; // 一般情况没有必要这样声明
组件结构规范
按照一定的习惯组织代码,使得组件便于理解
react:
//设置数据默认值getDefaultProps() {}propTypes: {}getInitialState() {}componentWillMount() {}componentDidMount() {}componentWillReceiveProps(nextProps) {}shouldComponentUpdate() {}componentWillUpdate() {}componentDidUpdate() {}componentWillUnmount() {}selfMethod()... //自定义方法render() ...
vue:
export default {// 不要忘记了 name 属性name: 'RangeSlider',// 组合其它组件extends: {},// 使用其它组件components: {},// 组件属性、变量props: {bar: {}, // 按字母顺序foo: {},fooBar: {},},// 变量data() {},computed: {},// 方法methods: {},watch: {},// 生命周期函数beforeCreate() {},mounted() {},};
使用组件名作为样式作用域空间
BEM:块(block)、元素(element)、修饰符(modifier)<form class="search-form"><input type="text" class="search-form__username"><input type="password" class="search-form__password ml10"><button class="search-form__submit active"></button><form>
事件命名规则
驼峰命名:oneTwoThree
动词 + 形容词 / 动词 + 名词
原生事件传递:handleClick, handleChange …
do it
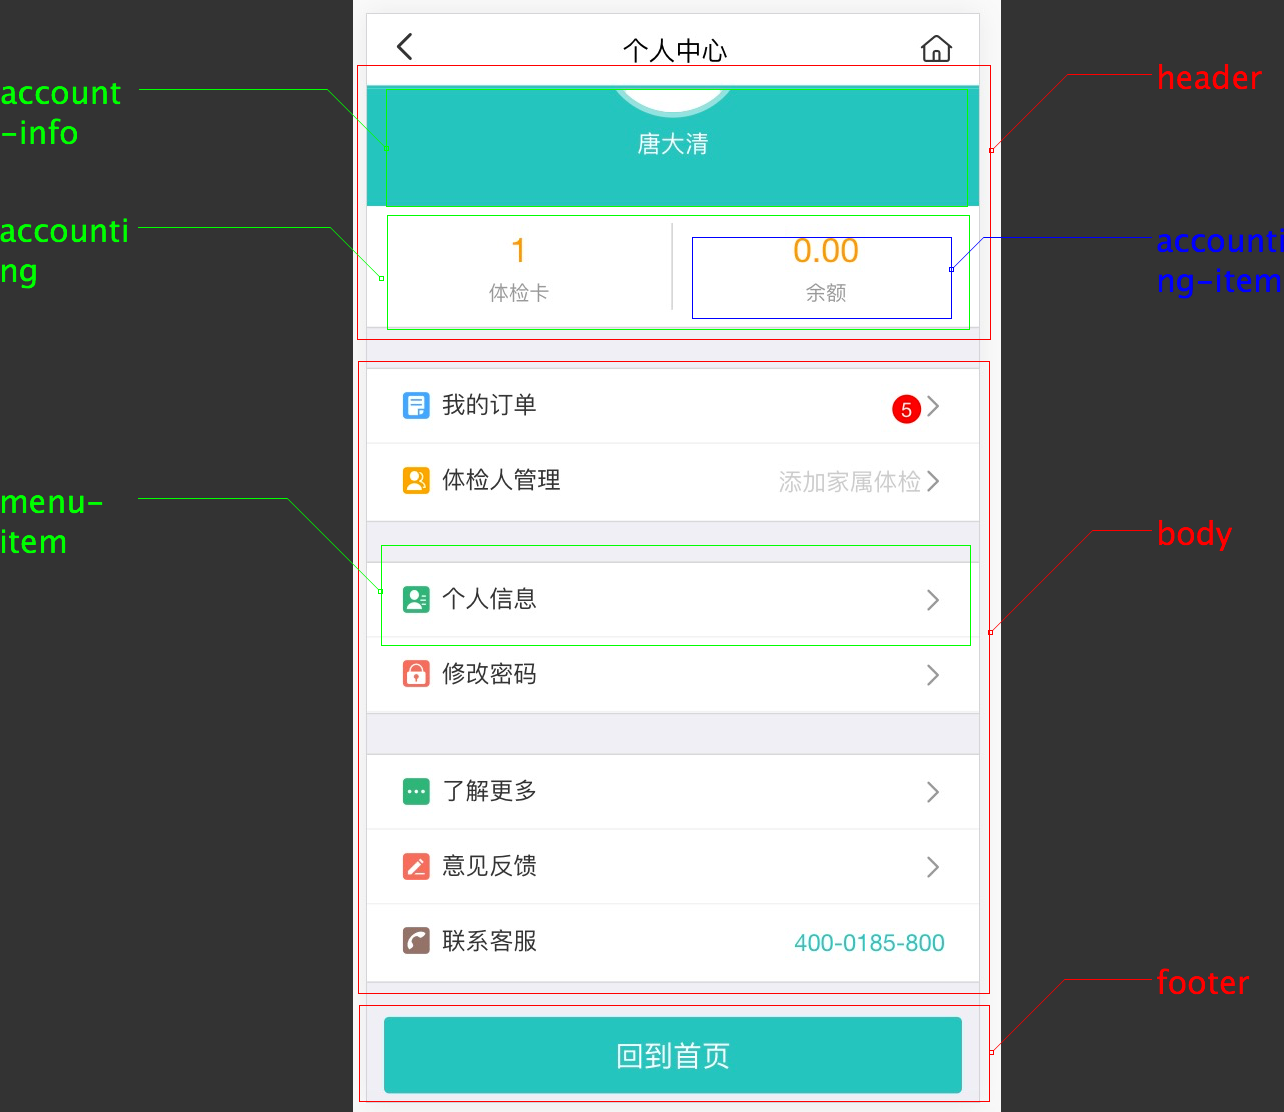
第一步:划分组件

第二步:编写静态版本
render: function() {if (this.state.loading) {return null;}let headerProps = {gender: this.state.account.gender,name: this.state.account.name,idCard: this.state.account.idCard,employeeId: this.state.account.employeeId,cardCount: this.state.amounts.cardCount,balanceAmount: this.state.amounts.balanceAmount};let orderBadgeLabel = (this.state.amounts.unExamOrderCount && this.state.amounts.unExamOrderCount > 0) ? this.state.amounts.unExamOrderCount : '';let menuList1 = [{label: '我的订单', location: TJ.tourl('/orderlist'), ...},{label: '体检人管理', location: TJ.tourl('/healthermanage'), ...}]let menuList2 = [{label: '个人信息', location: TJ.tourl('/personalinfo'), ...},{label: '修改密码', location: TJ.tourl('/updatepwd'), icon: 'icon-xiugaimima color-red'},]let menuList3 = [{label: '了解更多', location: TJ.tourl('/guidance'), ...},{label: '意见反馈', location: TJ.tourl('/feedback'), ...},{label: '联系客服', location: 'tel://400-0185-800', ...}]let rightBtn = (<a className="moremenu-icon iconfont icon-shouye" href={TJ.tourl('/welcome')}> </a>);return (<div className="container"><HeaderView title='个人中心' rightBtn={rightBtn}/><UcHeaderView {...headerProps} /><UcBodyView menuList1={menuList1} menuList2={menuList2} menuList3={menuList3} /><UcFooterView isWeixin={this.state.wxbind} /></div>);}/** 个人中心页面上部*/var UcHeader = React.createClass({getDefaultProps() {return {gender: 0}},propTypes: {cardCount: React.PropTypes.number,balanceAmount: React.PropTypes.number},render: function() {let { name, gender, idCard, employeeId, cardCount, balanceAmount } = this.props;let accountingItems = [{ label: '体检卡', amount: cardCount, location: '/usercentercard' },{ label: '余额', amount: TJ.formatPrice(balanceAmount), location: '/cashaccount' }];return (<div><AccountInfoView name={name} gender={gender} idCard={idCard} employeeId={employeeId} /><AccountingView accountingItems={accountingItems} /></div>);}});/** 菜单项* location 跳转路径* icon 图标className* badgeLabel 红色徽标显示内容* showArrow 是否显示右边箭头* placeholder 右边显示内容*/var MenuView = React.createClass({getDefaultProps() {return {showArrow: true}},propTypes: {label: React.PropTypes.string.isRequired},render: function() {let {label, location, icon, badgeLabel, showArrow, placeholder} = this.props;return (<a href={location} className="common-link grey-bor" style={{padding: '0rem 0.2rem'}}><i className={'iconfont ico-margin ' + icon} /><span className="text-dark">{label}</span>{showArrow ? <i className="next-link iconfont icon-xiangyou" /> : null}{badgeLabel ? <em className="morenum-icon fr" >{badgeLabel}</em> : null}{placeholder ? <span className="fr text-grey linehight48">{placeholder}</span> : null}</a>);}});
第三步:添加 状态 / 逻辑
// 用户信息var AccountInfoView = React.createClass({// 1. 组件内部交互this.setState({showModal: true});render: function() {// 2. 对数据的处理,如果没有名字,显示身份证号,如果没有身份证,显示员工号let username = (this.props.name || this.props.idCard || this.props.employeeId);// 3. 变量的转化,简化DOM使用参数let imgUrl =(this.props.gender && this.props.gender == 1) ? '/app/base/bg/girl.png' : '/app/base/bg/boy.png';// 4. 添加事件shake(e) {let [obj, i, timer, d] = [$(e.target), 5, null, 5];clearInterval(timer);timer = setInterval(function(){obj.css({"position": "relative", "left": d + "px"});i--;d = -d;if (i === 0) {clearInterval(timer);}},50);},return (<div className="photo-bg mainbackground"><img src={imgUrl} onClick={this.shake} /><p>{username}</p></div>);}});
第四步:通信
常用几种方式:props传递、pub-sub方式、flux/redux(vuex)
props:
<Parent>{/* 以属性的形式传入子组件 */}<Children handleClick={this.operate} /></Parent>{/* 子组件调用父组件传入的方法 */}<Children onClick={this.props.handleClick} />
pub-sub:
# pub:PubSub.publish('usercneter:testpubsub:success', 'bgred');# sub:componentWillMount() {this.testpubsubToken = PubSub.subscribe('usercneter:testpubsub:success', (msg, data) => {this.changeBg(data);});}# 注销发布componentWillUnmount() {PubSub.unsubscribe(this.testpubsubToken);}# key值规则PubSub.publish('usercneter:testpubsub:success');`模块:动作:状态`
flux/redux
利用全局状态管理(store),需要框架支持,目前C端还未使用。
vuex 管理组件间状态和通信,运维管理系统(ops)、渠道商管理(crm-channel)中已使用。
属性类型验证
React.createClass({propTypes: {// You can declare that a prop is a specific JS primitive. By default, these// are all optional.optionalArray: React.PropTypes.array,optionalBool: React.PropTypes.bool,optionalFunc: React.PropTypes.func,optionalNumber: React.PropTypes.number,optionalObject: React.PropTypes.object,optionalString: React.PropTypes.string,// Anything that can be rendered: numbers, strings, elements or an array// containing these types.optionalNode: React.PropTypes.node,// A React element.optionalElement: React.PropTypes.element,// You can also declare that a prop is an instance of a class. This uses// JS's instanceof operator.optionalMessage: React.PropTypes.instanceOf(Message),// You can ensure that your prop is limited to specific values by treating// it as an enum.optionalEnum: React.PropTypes.oneOf(['News', 'Photos']),// An object that could be one of many typesoptionalUnion: React.PropTypes.oneOfType([React.PropTypes.string,React.PropTypes.number,React.PropTypes.instanceOf(Message)]),// An array of a certain typeoptionalArrayOf: React.PropTypes.arrayOf(React.PropTypes.number),// An object with property values of a certain typeoptionalObjectOf: React.PropTypes.objectOf(React.PropTypes.number),// An object taking on a particular shapeoptionalObjectWithShape: React.PropTypes.shape({color: React.PropTypes.string,fontSize: React.PropTypes.number}),// You can chain any of the above with `isRequired` to make sure a warning// is shown if the prop isn't provided.requiredFunc: React.PropTypes.func.isRequired,// A value of any data typerequiredAny: React.PropTypes.any.isRequired,// You can also specify a custom validator. It should return an Error// object if the validation fails. Don't `console.warn` or throw, as this// won't work inside `oneOfType`.customProp: function(props, propName, componentName) {if (!/matchme/.test(props[propName])) {return new Error('Validation failed!');}}},/* ... */});
Props与State对比
Props与State之间也是有很多交集的,譬如:
- Props与State都是JS对象。
- Props与State的值的改变都会触发界面的重新渲染。
- Props与State都是确定性的,无副作用的,即在确定的Props或者State的值的情况下都会得出相同的界面。
差异:
Props顾名思义,更多的是作为Component的配置项存在。Props往往是由父元素指定并且传递给自己的子元素,不过自身往往不会去改变Props的值。另一方面,State在组件被挂载时才会被赋予一个默认值,而常常在与用户的交互中发生更改。往往一个组件独立地维护它的整个状态机,可以认为State是一个私有属性
Mixins:组件的继承
虽然组件的原则就是模块化,彼此之间相互独立,但是有时候不同的组件之间可能会共用一些功能,共享一部分代码。所以 React 提供了 mixins 这种方式来处理这种问题。Mixin 就是用来定义一些方法,使用这个 mixin 的组件能够自由的使用这些方法(就像在组件中定义的一样),所以 mixin 相当于组件的一个扩展,在 mixin 中也能定义“生命周期”方法。
var SetIntervalMixin = {componentWillMount: function() {this.intervals = [];},setInterval: function() {this.intervals.push(setInterval.apply(null, arguments));},componentWillUnmount: function() {this.intervals.map(clearInterval);}};var TickTock = React.createClass({mixins: [SetIntervalMixin], // Use the mixingetInitialState: function() {return {seconds: 0};},componentDidMount: function() {this.setInterval(this.tick, 1000); // Call a method on the mixin},tick: function() {this.setState({seconds: this.state.seconds + 1});},render: function() {return (<p>React has been running for {this.state.seconds} seconds.</p>);}});React.render(<TickTock />,document.getElementById('example'));
React 的 mixins 的强大之处在于,如果一个组件使用了多个 mixins,其中几个 mixins 定义了相同的“生命周期方法”,这些方法会在组件相应的方法执行完之后按 mixins 指定的数组顺序执行。
ref:
https://segmentfault.com/a/1190000003748289
http://www.tuicool.com/articles/2yI3ea6
http://blog.csdn.net/shilu89757/article/details/42418283
https://zhuanlan.zhihu.com/p/25654116
